
How To Get The Best Flat Lay Photo For Beginners
10 Steps To Perfect Your Flat Lay Photos With Glamcor
You’ve seen them everywhere from beauty magazines, cooking blogs, and your favorite brand’s Instagram page. Even content creators create them to showcase their favorite go-to beauty products or #coffeebreak essentials. Flay lays are all the rage.
What are flat lays?
Flatlays are a bird’s eye view of whatever it is you’re taking a picture of. Usually laid flat against a background but also strategically placed to create movement and excitement.
As easy as taking pictures of unanimated objects may seem, it’s actually not. So if you’re looking to jump on this trend, we’ve put together 10 steps for you to get it right.

1. Your first shot wont be perfect
First and foremost, this is the number one tip to keep in mind as you practice your flat lay photos—your first shot won’t be perfect. And maybe even your second or third shot won’t, and that’s ok.
Flat lays are like a puzzle. You need to consistently arrange and rearrange until you get it just right, so don’t worry if it takes a couple of tries. That’s part of the process.
2. Pick a color palette
Choosing a color palette is more than just picking a few colors. It helps set the tone and vibe of the overall image and story you want to portray. Select a color palette with a few complementary colors that match your main object or product and find props that also fit within that color palette.
3. Choose your background
Most flat lays work really well on flat, white backgrounds. However, if you plan to post on Instagram, keep in mind that your white background may appear muddy in contrast to Instagram’s stark white grid lines.
If you’re looking to add a little more oomph to your photos, look for backgrounds that contrast with the colors of the items you’re photographing. Examples of backgrounds that work well are wooden table tops, a desktop, china for food items, contact paper, and flat lay backdrops. Stay away from shiny backgrounds because they can reflect unnecessary light in your images.

4. Add layers for depth.
Although a simple flat background is the easiest way to achieve a great flat lay, adding layers for depth brings new dimensions to your photos.
In food photography, a flat lay may look like a cloth towel, wax paper, and a plate with a muffin on top. This creates movement in your photos and makes them more in touch with the reality of your main object or product.
5. Use props
Props help create intriguing images and tell a story about the product or main object. They add context and don’t overshadow but elevate your focal object or product. Props are important for flat lays and should be considered every time you shoot.
6. Composition (aka placement)
The way you place your items are just as important as the background, and like tip number one stated, it’s a puzzle you need to work through.
Instead of placing your main item in the center of a shot, experiment with different arrangements allowing for an “overflow” of your items. That way, viewers can use their imagination on what the bigger picture really is. Want a more symmetrical shot? Arrange in a grid or straight line.
Use negative (empty) space to your advantage. And for props that don’t stay in place, double-sided tape is your friend.

7. Lighting, lighting, lighting
One of the most important aspects of good photography, regardless if you’re a professional or simply taking shots for your small business Instagram page, is lighting. The main goal with lighting isn’t to create a spotlight but a consistent glow and illumination.
Like in all photography, natural lighting is best. However, that’s not always the case, depending on your location, time of day, and weather conditions. When using lighting, make sure to use LED lights with daylight settings. By using lighting equipment with daylight settings, you’re able to mimic natural lighting consistently regardless of what Mother Nature has in store.
Shadows are either a no-go for your flat lay or part of the vibe and experience you want to portray in your photo. Neither is wrong. If you want to get rid of shadows, indirect natural lighting is the way to go. Separate lighting equipment are also easier to maneuver and angle as opposed to overhead lighting that creates shadows.
8. Get up high
What makes flat lays different from other photo styles is the birds-eye view element. To achieve that, you need to get up high. And sometimes, standing on a chair, hunching your back to look into a camera, or extending your arms with your phone time and time again may not be the best way to go about it.
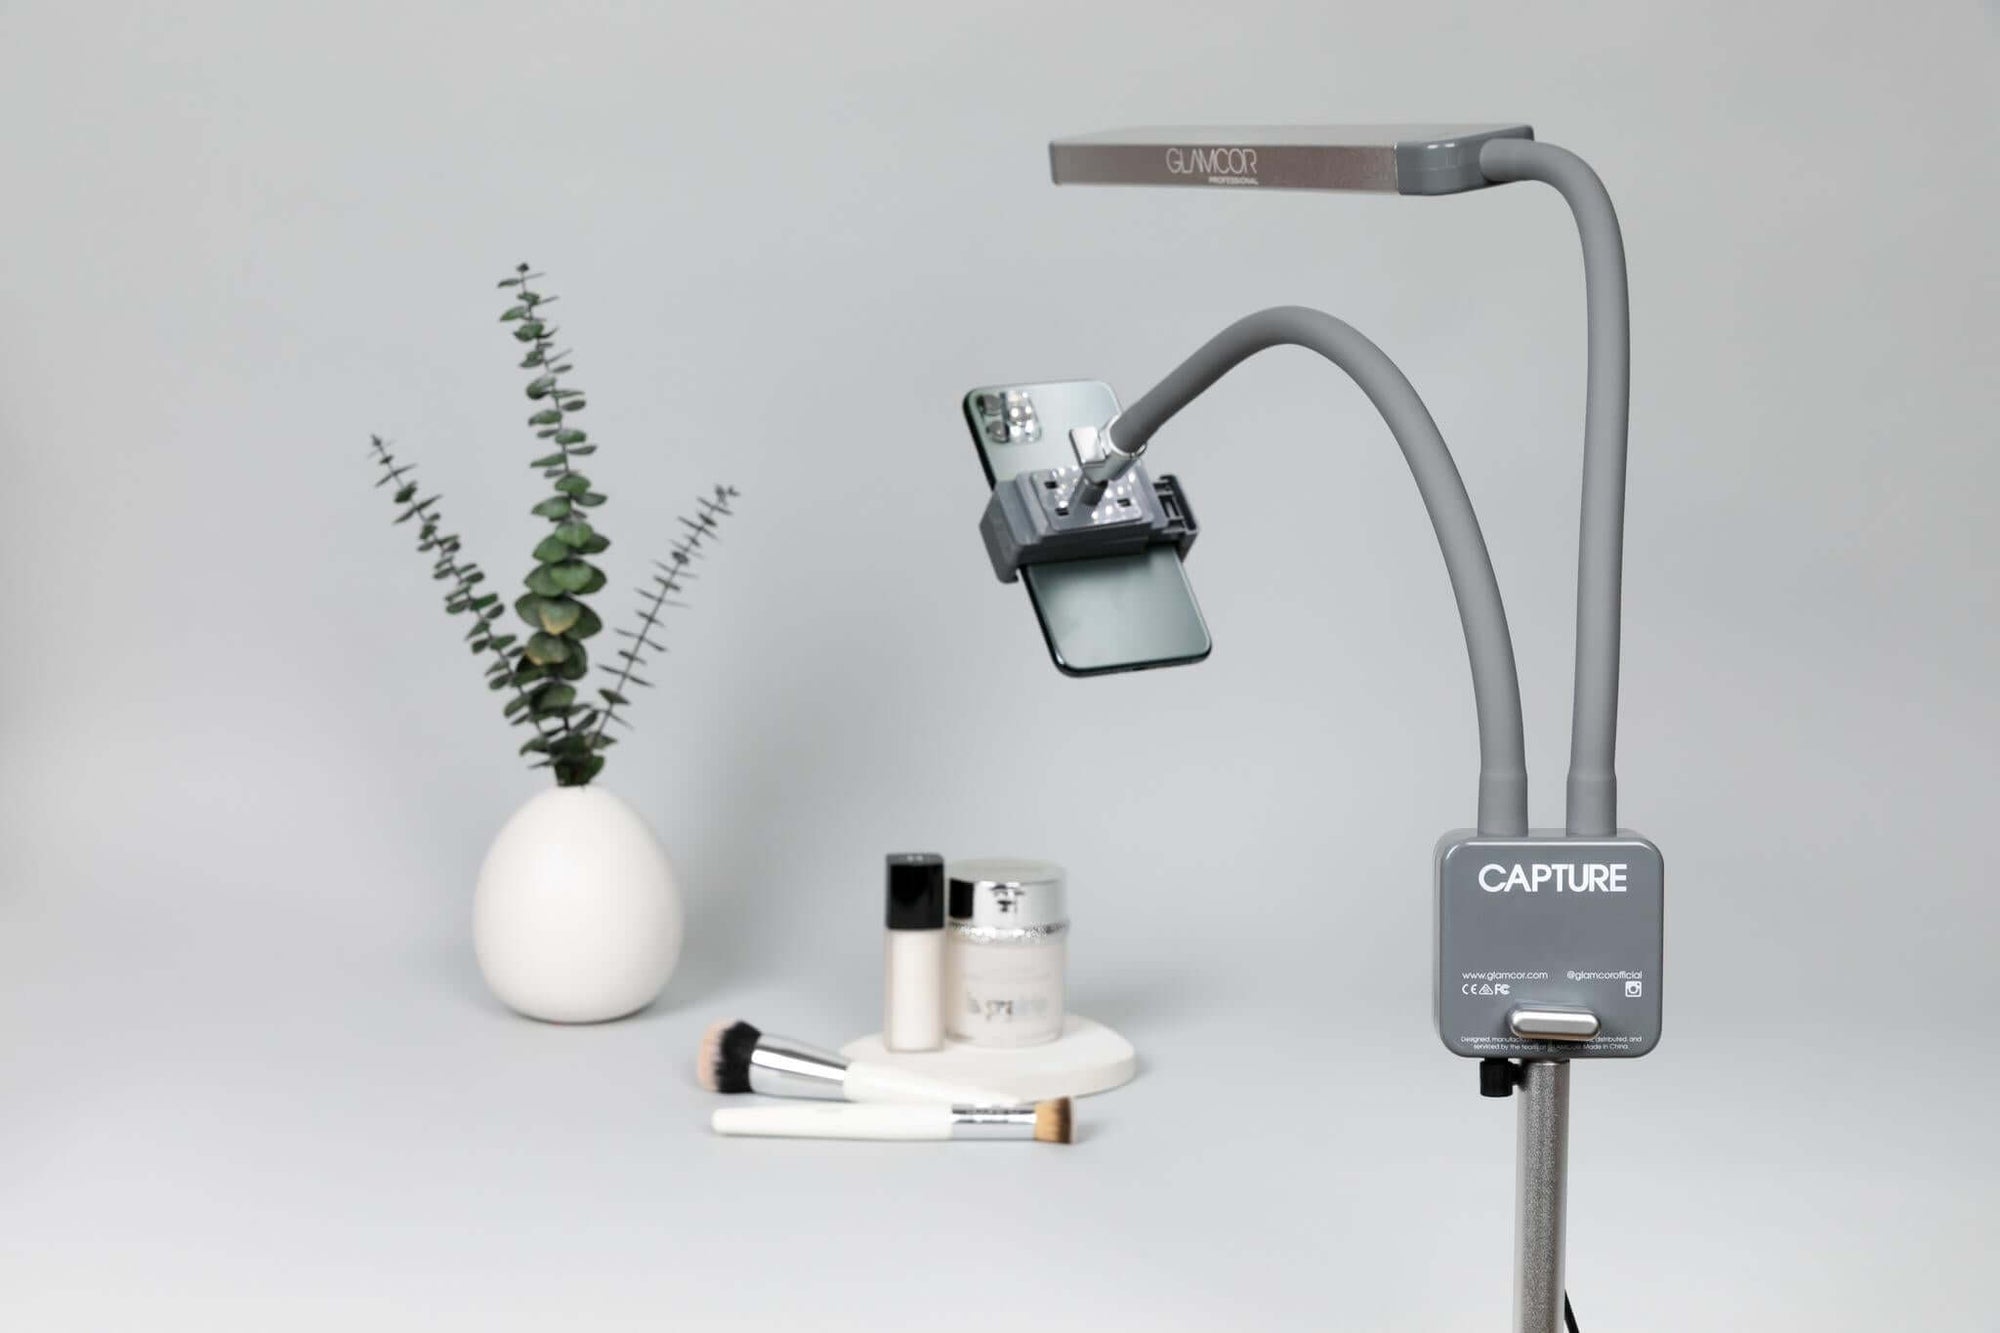
A tripod with an extended arm works best in all scenarios like Glamcor’s Capture or Multimedia X Content Creation Kit. Both have an adjustable telescopic stand with four legs (not three) for stability and flexible arms that securely hold a smartphone or even a camera, making it easier and safer to get a birds-eye view without the neck, back, or arm aches. Creating your flat lay on the floor also helps with achieving height.
Want to know the difference between the two lighting and content creation equipment? Scroll down to the end.

9. Use the grid feature on your smartphone
Over the years, cameras on smartphones continuously improved. One way it has improved is with the grid feature. The grid feature allows you to align your phone camera with the object you’re photographing. That way, you can get the overtop bird’s eye view without a slight tilt or angle.
10. Edit away
Editing has a bad rep, but it’s essential to creating a cohesive look for your brand, business, or Instagram feed. This can be easily achieved with presets from photo editing tools like Lightroom. If that’s not possible, simply brightening and removing any shadows from your photos is good enough to produce quality flat lay images.
Capture vs. Multimedia X Content Creation Kit
Both lighting equipments are ideal for flat lays but which is best and what makes them different?
Capture consists of one LED light bar with daylight lighting and five dimming stages attached to a flexible luminary arm so that you have full control of the lighting angle. The other flexible arm consists of a phone clip that can be placed directly over your flat lay set up for the best bird’s eye view photo.
Capture is ideal for the newbie who is getting started in the content creation world and needs a simple solution for lighting and capturing photos or videos in the right angle.

The Multimedia X Content Creation Kit contains two LED light bars with daylight lighting, color temperature control, and dimming stages. It also comes with an attachable universal phone clip, a camera clip, and a tablet clip.
The Multimedia X Content Creation Kit also includes a Bluetooth-powered remote control that way you can remotely control your device and lighting while simultaneously charging it with the onboard USB port.
It’s the best lighting equipment on the market for avid content creators and can be used in multiple ways, from Facebook live to creating TikTok videos, or self-portraits.
No matter which one you choose, know that Glamcor is at the forefront of innovative lighting equipment made especially so you have full control of your content creation.